Search This Blog

Tuesday, November 10, 2009

Ambient Occlusion Tutorial - Blender 3D

In this tutorial we will be learning how to use Ambient Occlusion. We will learn a quick start Ambient Occlusion process and it's options.

Ambient Occlusion is a lighting option, or rather a lack of lighting. It takes the faces of nearby objects and removes the light on other nearby faces making it look like shadows.

Quick Start Ambient Occlusion

1) Hit the "F5" key or select the "Shading" button.

2) Select the "World" button

3) Select the "Ambient Occ" tab that sits next to the "Mist/Stars/Phisi" tab.

4) Select the "Ambient Occlusion" button.

5) Hit the "F12" button to render your work
.


(Top - Default Lighting) (Botton - Ambient Occlusion with no lighting)


Options for Ambient Occlusion

Max Dist: These levels select the length of your rays. By increasing your rays you will get a much harsher ambient. By reducing the length of the rays you will get a softer ambient and your work will render faster.

Use Falloff: If you select this button you will be able to set the strength of your shadows depending on their distance from another object.

Gather Method button: this button has two option within. The first is "Raytrace". This is one way of selecting the occlusion gathering process. Your renders will take longer to render, but the quality will be higher. The other method is "Approximate." This is an alternate way of selecting the occlusion gathering process. This will reduce the time it takes to render your work, but the quality of the occlusion is lower.

Add button: This button adds light and shadows to your work.

Sub button: This button subtracts light and shadows to your work.

Both button: This button lightens and darkens your work.

Plain button: (Plain Diffuse Energy) This button makes your light energy white.

Sky Color button: This button uses zenith and horizon colors for your diffuse energy.

Sky Texture button: This button provides a total sky texture for your diffuse energy when you render your work.

Links to other tutorial for Ambient Occlusion

Blender tutorial 6 : Ambient occlusion by 3DMacDaddy - www.youtube.com/watch?v=RBo8UxMkW4Y
Learn how to enable Ambient Occlusion. Video. Audio

Bits of Blender #34 - Ambient Occlusion by bitsofblender - www.youtube.com/watch?v=H4OcZrVOykA
Video. Audio.

Explode Tutorial - Blender 3D

In this tutorial we will learn how to make an object appear to explode.

1) Select your object.

2) Hit the "F7" key.

3) Select the "Particles" button.

4) Hit "Add New" in the Particle Systems section.


5) In the Particle System section, change "Amount" to 5000.

6) In the Particle System section, change "End" to 250

7) In the Particle System section, change "Life" to 100.

8) In the Particle System section, select the "Even" button

9) In the Particle System section, select the "Random" button,


10) In the Physics section, change "Normal" to 0.50.

11) In the Physics section, change "Random" to 0.070.

12) In the Visualization section select "Point" and change it to "None."

13) In the Visualization section select the "Render Emitter" button.

14) Hit the "F9" key.

15) In the Modifier section hit the "Add Modifier" button and add "Explode."

16) Hit the "ALT" and the "A" keys at the same time to preview your work.

17) Use the Frame Display to preview each picture or select a frame that you would like to render.

Links to other "Explode" Tutorials

explode modifier blender tutorial by blenderspy - www.youtube.com/watch?v=OIZItrsJdQk
Video. Audio.

-legendz- explosion tutorial (blender) by legendz53 - www.youtube.com/watch?v=G4ajf265G2Q
Video. Audio. Text Instructions.

blender tutorial explosion (less than 1 minute) by klikendish - www.youtube.com/watch?v=uiO66UUGbs4
Video. No Audio. Text Instructions

Object Layer Transfer Tutorial- Blender 3D

In this Tutorial we will be learning how to transfer an object from one layer to another. For you Blender veterans this tutorial is probably trivial, but as a newbie it would have saved me a lot of time.

1) Make sure you are in Object Mode.

2) Make sure the object you want to transfer is selected.

3) Make sure nothing else is selected.

4) Hit the "M" key.

5) A box of layers will appear. Select the layer that you want to transfer to by left clicking on it.

Monday, November 9, 2009

Applying Physics Tutorial - Blender 3D

In this tutorial we will be learning how to apply physics to our renders. Blender 3D allows for realistic physics simulations. This means that it allows objects to roll, fall, and collide with other objects.

1) Hit the "F4" key.

2) Make sure your object(s) is selected.

3) Change it from "Static" to "Rigid Body"

4) Deselect the "Actor" button.

5) Follow steps 2 through 4 for each object you want to include in your render.

6) Hit the "P" key to preview.

7) Hit the "Game" tab at the top of your screen and select "Record Physics to IPO."

8) Hit the "P" key to preview.

9) Run through the frames to verify.

Links to other Physics Tutorials

Rigid Body Physics Tutorial #1 - Basics by raven67854 - http://www.youtube.com/watch?v=7QLum_cdCMA
Video. Audio.

Blender-Physics Tutorial by DanielSDZ - http://www.youtube.com/watch?v=S8L7nYQqHGw&feature=fvw
Video. Audio. Text Instructions.

Blue Sky Tutorial - Blender 3D

In this tutorial we will be learning how to give our renders a blue sky.


1) Hit the "F5" button or select the "Shading" button.


2) Hit the "World" button.


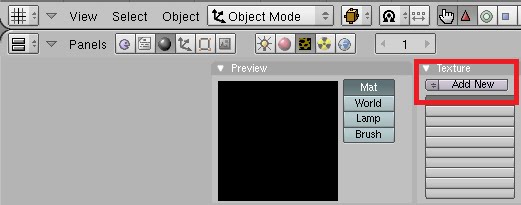
3) Hit the "Add New" button under the Texture and Input section.


4) Hit the "Map To" tab.


5) Hit the "Horizon" button.


6) Change the R,G,B to be white. Or set all to 1.0.


7) Hit the "F6" key or select the "Texture" Button


8) Change "Texture Type' to clouds.


9) Under the Clouds section change the Noise Size to 0.550.


10) Under the Clouds section change the Noise Depth to 6


12) Render your work.
(Note) Hit the "F12" button to render.


Links to other Sky Tutorials
Blender Tut 11: How to make a sky - www.youtube.com/watch?v=FH1XBLZz-wI
Learn how to make your backgrounds look like a day or night sky. Video. Audio.

Glass Tutorial - Blender 3D

In this tutorial we will learn how to make and object look like it is made of glass.

1) Select your object.


2) Hit the "F5" button or select the "Shading" button.


3) Hit the "Add New" button under the Links and Pipeline section.


4) Lower the Alpha to 0.0
(Note) Alpha is located below the R,G,B.


5) Hit the "Ray Mirror" button in the Shaders section.


6) Change Ray Mirror to read .30


7) Change Ray Mirror Depth to 3


8) Hit the "Ray Transparency" button in the Shaders section.


9) Change the Ray Transparency IOR to 1.50.


10)Change the Ray Transparency Depth to 3


11) Render your work.
(Note) Hit the "F12" button to render.


Links to other Glass Tutorials


Blender Galss tutorial by punkstoper www.youtube.com/watch?v=NZMVB0LFSTs
Video. Audio.

Glass material in Blender by sobaver www.youtube.com/watch?v=WPCDXHkjvxQ
Video. Audio

Grass Tutorial - Blender 3D

In this tutorial we will be learning how to add grass to a plane.


1) Make sure your plane is selected.


2) Hit the "F7" Button or select the "Object" button.  (Highlighted In Red In the Picture Below)


3) Hit the "Particles Button." (Highlighted In Red In the Picture Below)


4) Hit the "Add New" button under Particle system. (Highlighted In Red In the Picture Below)


5) Change "Emitter" to "Hair" (Highlighted In Red In the Picture Below)


6) Change "Amount" to 30000  (Highlighted In Red In the Picture Below)
(Note) This amount is just a starting point. Depending on how big your plane is you may need more or less.


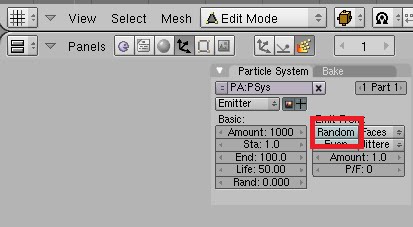
7) Click the "Random" button under the Emit From: section. (Highlighted In Red In the Picture Below)


8) Click the "Even" button under the Emit From: section. (Highlighted In Red In the Picture Below)


9) Change "Normal" to .020 under the Initial Velocity section.  (Highlighted In Red In the Picture Below)


10) Change "Random" to .020 under the Initial Velocity section.  (Highlighted In Red In the Picture Below)


11) Change the AccX:, AccY:, and AccZ:, each to 0.01 (Highlighted In Red In the Picture Below)


12) Hit the "Emitter" button under the Render section.  (Highlighted In Red In the Picture Below)
(Note) This button lets you see the emitter in render.


13) Hit the "F5" key or the "Shading" button.  (Highlighted In Red In the Picture Below)


14) In the Links and Pipeline section under link to object hit the "Add New" button.  (Highlighted In Red In the Picture Below)


15) Hit the "Strands" button under the Render Pipeline section. And change the Start and End to read:
A) Start 1.25
B) End 0.25
(Highlighted In Red In the Picture Below)


16) Change the R,G,B to read:
A) R 0.01
B) G 0.06
C) B 0.01
(Highlighted In Red In the Picture Below)
(note) This is just a guide line. Adjust this to suit the color you want.


17) Hit the "F6" key or select the "Textures" button.  (Highlighted In Red In the Picture Below)


18) Hit the "Add New" button under the Texture section.  (Highlighted In Red In the Picture Below)


19) Change Texture Type to Image.  (Highlighted In Red In the Picture Below)


20) Click the "Load" button under the Image section.  (Highlighted In Red In the Picture Below)


21) Select your image.
(Note) I got my image from http://www.photobucket.com/ Just search "Grass Texture."

22) Render your work.
(Note) Hit the "F12" key to render.


Links to other Grass Tutorials

The Secret to Creating Realistic Grass - http://www.blenderguru.com/the-secret-to-creating-realistic-grass/


Blender Grass Tutorial by BjornkeGeish - www.youtube.com/watch?v=UJ_YT2FeiIU
Learn how to produce high quality grass using using Blender 2.49a and it's Particle system. Video. Audio.


"Grass" Blender Tutorial by CathyDirector - www.youtube.com/watch?v=1NclixES8iU
Video. Audio