In this Tutorial we will be learning how to load an Object from one .Blend file to another.
1) Go into "File"
2) Select "Append or Link"
3) Choose the .Blend file your Object is in
3) Select "Object"
4) Select the Name of the Object you want to grab
5) Select "Load Library"
The Object you selected should now be on your screen.
Links to other tutorials on Importing Objects in Blender
Adding Objects From Other Files With Append by super3boy
http://www.youtube.com/watch?v=X67IRjt4LQQ
Special Blender Tutorial - Using the APPEND function by agent47crows
http://www.youtube.com/watch?v=4deJ5wDIBR8
Bits of Blender #35 - Appending and Linking by bitsofblender
http://www.youtube.com/watch?v=x8d46JwxwaU
Be creative, Be artistic, Be 3D and Blend well.
Sunday, November 15, 2009

Saturday, November 14, 2009
Night Sky Tutorial - Blender 3D
In this tutorial we will learn how to make a night sky.
1) Hit the "F5" key or select the "Shading" button.

2) Select the "World" button.

3) Under the "World" section; set the HoR, HoG, and the HoB each to 0.00
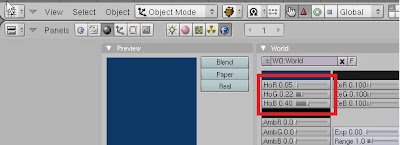
4) Under the "Mist /Stars /Phisi" section select the "Stars" button.

5) Hit the "F12" key to render your work.

1) Hit the "F5" key or select the "Shading" button.

2) Select the "World" button.

3) Under the "World" section; set the HoR, HoG, and the HoB each to 0.00

4) Under the "Mist /Stars /Phisi" section select the "Stars" button.

5) Hit the "F12" key to render your work.

Links to other Night Sky Tutorials
Blender Tut 11: How to make Sky by hamsterhill
http://www.youtube.com/watch?v=FH1XBLZz-wI
Super3boy's Tutorial List and Links
From newbies to professional Blender 3D users; there are few who have not learned something from Super3boy's YouTube tutorials. If you use Blender 3D for still pictures, video games, or animation; Super3boy has a tutorial for you.
Along with this list and it's links you will find a link to Super3boy's forum, Nystic. This forum and the people who use it have been an important part of my Blender 3D education. I am sure they would be a great asset to you as well.
Well here they are. A neatly compiled list of all Super3boy's tutorials and their links. Be creative, Be artistic, Be 3D and Blend well.
Nystic
http://forum.nystic.com/
Super3boy's First Blender Tutorial
http://www.youtube.com/user/super3boy#p/u/37/ozlwcQT-U20
Super3boy's First Blender Tutorial (Basics - Blender 2.5 Remake)
http://www.youtube.com/watch?v=3BwptkZCWwU
Super3boy's RPG Blender Tutorial #1 (Character Setup)
http://www.youtube.com/watch?v=nJEwLhnFwdk
Super3boy's Second Blender Tutorial(part 1)
http://www.youtube.com/profile?user=super3boy#p/u/35/xYkaHylMPdc
Super3boy's Second Blender Tutorial(part 2)
http://www.youtube.com/profile?user=super3boy#p/u/34/Q7omA7imr1k
Super3boy's Second Blender Tutorial(part 3) - Lost Episode
http://www.youtube.com/profile?user=super3boy#p/u/1/fwN6TFYxkU0
Super3boy's Third Blender Tutorial(Subsurf)
http://www.youtube.com/user/super3boy#p/c/DE37E771345BCC6F/3/bDJ76_chDDo
Super3boy's Fourth Blender Tutorial(Editing)
http://www.youtube.com/user/super3boy#p/c/DE37E771345BCC6F/4/LL-cYoTQI4Q
Super3boy's Fifth Blender Tutorial(Toolbar)
http://www.youtube.com/user/super3boy#p/c/DE37E771345BCC6F/5/l8ZiywMyiBM
Super3boy's Sixth Blender Tutorial(Materials)
http://www.youtube.com/user/super3boy#p/c/DE37E771345BCC6F/6/2kk2BkVQkyk
Super3boy's Seventh Blender Tutorial(Animation)
http://www.youtube.com/user/super3boy#p/c/DE37E771345BCC6F/7/FAZFfLmbD2k
Super3boy's Eighth Blender Tutorial(Scene)
http://www.youtube.com/user/super3boy#p/c/DE37E771345BCC6F/8/baPR_NOGxE8
Super3boy's Ninth Blender Tutorial(Particles)
http://www.youtube.com/user/super3boy#p/c/DE37E771345BCC6F/9/4ylN9yjCP_4
Super3boy's Tenth Blender Tutorial(UV Mapping)
http://www.youtube.com/user/super3boy#p/c/DE37E771345BCC6F/10/mVhhZ2KRr4Q
Super3boy's Twelfth Blender Tutorial(Making Waves)
http://www.youtube.com/user/super3boy#p/c/DE37E771345BCC6F/12/Q9EE5JLoCpk
Super3boy's 13th Blender Tutorial(Making a Basic Game)
http://www.youtube.com/user/super3boy#p/c/DE37E771345BCC6F/13/WGycLDs_dLg
Super3boy's 14th Blender Tutorial(A Cloth With Softbodies)
http://www.youtube.com/user/super3boy#p/c/DE37E771345BCC6F/14/mgYhZ3hWwTQ
Super3boy's 15th Blender Tutorial(Using Blender Fluids)
http://www.youtube.com/user/super3boy#p/c/DE37E771345BCC6F/15/yMBx2pYiqnY
Super3boy's 16th Blender Tutorial(Grass with Particles)
http://www.youtube.com/user/super3boy#p/c/DE37E771345BCC6F/16/M9aG0xBl9IM
Super3boy's 17th Blender Tutorial(Making A Chess Board)
http://www.youtube.com/user/super3boy#p/c/DE37E771345BCC6F/17/VhIvaWUxF1E
Super3boy's 18th Blender Tutorial(Beam Down Effect)
http://www.youtube.com/user/super3boy#p/c/DE37E771345BCC6F/18/lC2KgpdVUUU
Super3boy's 19th Blender Tutorial(Domino Physics)
http://www.youtube.com/user/super3boy#p/c/DE37E771345BCC6F/19/3kb_utKDu3o
Super3boy's 20th Blender Tutorial(Using Armatures)
http://www.youtube.com/user/super3boy#p/c/DE37E771345BCC6F/20/GbFvrilssNo
Super3boy's 21st Blender Tutorial(Making A Sword)
http://www.youtube.com/user/super3boy#p/c/DE37E771345BCC6F/21/whMozCIJGOw
Super3boy's 22nd Blender Tutorial(Using Dupliverts)
http://www.youtube.com/user/super3boy#p/c/DE37E771345BCC6F/22/M6EPXc8N3qs
Super3boy's 23rd Blender Tutorial(Matrix Bullet Time Effect)
http://www.youtube.com/user/super3boy#p/c/DE37E771345BCC6F/23/_7HFMApP7Dw
Super3boy's 24th Blender Tutorial(Explode Modifier)
http://www.youtube.com/user/super3boy#p/c/DE37E771345BCC6F/24/At3hIc-423c
Super3boy's 25th Blender Tutorial(Nodes)
http://www.youtube.com/user/super3boy#p/c/DE37E771345BCC6F/25/-tM1spWQ5aw
Super3boy's 26th Blender Tutorial(2.46 Hair, UV, and Grass)
http://www.youtube.com/user/super3boy#p/c/DE37E771345BCC6F/26/AmiyZ4sAdd8
Super3boy's 27th Blender Tutorial(SnapTo and Simple Deform)
http://www.youtube.com/user/super3boy#p/c/DE37E771345BCC6F/27/u29x_488jG4
Super3boy's 28th Blender Tutorial(Grease Pencil)
http://www.youtube.com/user/super3boy#p/c/DE37E771345BCC6F/28/I9ZYhBFSAR4
Super3boy's 29th Blender Tutorial(World Tab)
http://www.youtube.com/user/super3boy#p/c/DE37E771345BCC6F/29/Gftx40dVEzs
Super3boy's 30th Blender Tutorial(Landscapes with Heightmaps)
http://www.youtube.com/user/super3boy#p/c/DE37E771345BCC6F/30/rC4I3zpIFdE
Adding Objects From Other Files With Append
http://www.youtube.com/user/super3boy#p/u/24/X67IRjt4LQQ
Super3boy FastF12 Render Manager Preview
http://www.youtube.com/watch?v=oTU0-dGzjn8
Super3boy Question Session
http://www.youtube.com/profile?user=super3boy#p/u/3/dbvVeELHWqU
Along with this list and it's links you will find a link to Super3boy's forum, Nystic. This forum and the people who use it have been an important part of my Blender 3D education. I am sure they would be a great asset to you as well.
Well here they are. A neatly compiled list of all Super3boy's tutorials and their links. Be creative, Be artistic, Be 3D and Blend well.
Nystic
http://forum.nystic.com/
Super3boy's First Blender Tutorial
http://www.youtube.com/user/super3boy#p/u/37/ozlwcQT-U20
Super3boy's First Blender Tutorial (Basics - Blender 2.5 Remake)
http://www.youtube.com/watch?v=3BwptkZCWwU
Super3boy's RPG Blender Tutorial #1 (Character Setup)
http://www.youtube.com/watch?v=nJEwLhnFwdk
Super3boy's Second Blender Tutorial(part 1)
http://www.youtube.com/profile?user=super3boy#p/u/35/xYkaHylMPdc
Super3boy's Second Blender Tutorial(part 2)
http://www.youtube.com/profile?user=super3boy#p/u/34/Q7omA7imr1k
Super3boy's Second Blender Tutorial(part 3) - Lost Episode
http://www.youtube.com/profile?user=super3boy#p/u/1/fwN6TFYxkU0
Super3boy's Third Blender Tutorial(Subsurf)
http://www.youtube.com/user/super3boy#p/c/DE37E771345BCC6F/3/bDJ76_chDDo
Super3boy's Fourth Blender Tutorial(Editing)
http://www.youtube.com/user/super3boy#p/c/DE37E771345BCC6F/4/LL-cYoTQI4Q
Super3boy's Fifth Blender Tutorial(Toolbar)
http://www.youtube.com/user/super3boy#p/c/DE37E771345BCC6F/5/l8ZiywMyiBM
Super3boy's Sixth Blender Tutorial(Materials)
http://www.youtube.com/user/super3boy#p/c/DE37E771345BCC6F/6/2kk2BkVQkyk
Super3boy's Seventh Blender Tutorial(Animation)
http://www.youtube.com/user/super3boy#p/c/DE37E771345BCC6F/7/FAZFfLmbD2k
Super3boy's Eighth Blender Tutorial(Scene)
http://www.youtube.com/user/super3boy#p/c/DE37E771345BCC6F/8/baPR_NOGxE8
Super3boy's Ninth Blender Tutorial(Particles)
http://www.youtube.com/user/super3boy#p/c/DE37E771345BCC6F/9/4ylN9yjCP_4
Super3boy's Tenth Blender Tutorial(UV Mapping)
http://www.youtube.com/user/super3boy#p/c/DE37E771345BCC6F/10/mVhhZ2KRr4Q
Super3boy's Twelfth Blender Tutorial(Making Waves)
http://www.youtube.com/user/super3boy#p/c/DE37E771345BCC6F/12/Q9EE5JLoCpk
Super3boy's 13th Blender Tutorial(Making a Basic Game)
http://www.youtube.com/user/super3boy#p/c/DE37E771345BCC6F/13/WGycLDs_dLg
Super3boy's 14th Blender Tutorial(A Cloth With Softbodies)
http://www.youtube.com/user/super3boy#p/c/DE37E771345BCC6F/14/mgYhZ3hWwTQ
Super3boy's 15th Blender Tutorial(Using Blender Fluids)
http://www.youtube.com/user/super3boy#p/c/DE37E771345BCC6F/15/yMBx2pYiqnY
Super3boy's 16th Blender Tutorial(Grass with Particles)
http://www.youtube.com/user/super3boy#p/c/DE37E771345BCC6F/16/M9aG0xBl9IM
Super3boy's 17th Blender Tutorial(Making A Chess Board)
http://www.youtube.com/user/super3boy#p/c/DE37E771345BCC6F/17/VhIvaWUxF1E
Super3boy's 18th Blender Tutorial(Beam Down Effect)
http://www.youtube.com/user/super3boy#p/c/DE37E771345BCC6F/18/lC2KgpdVUUU
Super3boy's 19th Blender Tutorial(Domino Physics)
http://www.youtube.com/user/super3boy#p/c/DE37E771345BCC6F/19/3kb_utKDu3o
Super3boy's 20th Blender Tutorial(Using Armatures)
http://www.youtube.com/user/super3boy#p/c/DE37E771345BCC6F/20/GbFvrilssNo
Super3boy's 21st Blender Tutorial(Making A Sword)
http://www.youtube.com/user/super3boy#p/c/DE37E771345BCC6F/21/whMozCIJGOw
Super3boy's 22nd Blender Tutorial(Using Dupliverts)
http://www.youtube.com/user/super3boy#p/c/DE37E771345BCC6F/22/M6EPXc8N3qs
Super3boy's 23rd Blender Tutorial(Matrix Bullet Time Effect)
http://www.youtube.com/user/super3boy#p/c/DE37E771345BCC6F/23/_7HFMApP7Dw
Super3boy's 24th Blender Tutorial(Explode Modifier)
http://www.youtube.com/user/super3boy#p/c/DE37E771345BCC6F/24/At3hIc-423c
Super3boy's 25th Blender Tutorial(Nodes)
http://www.youtube.com/user/super3boy#p/c/DE37E771345BCC6F/25/-tM1spWQ5aw
Super3boy's 26th Blender Tutorial(2.46 Hair, UV, and Grass)
http://www.youtube.com/user/super3boy#p/c/DE37E771345BCC6F/26/AmiyZ4sAdd8
Super3boy's 27th Blender Tutorial(SnapTo and Simple Deform)
http://www.youtube.com/user/super3boy#p/c/DE37E771345BCC6F/27/u29x_488jG4
Super3boy's 28th Blender Tutorial(Grease Pencil)
http://www.youtube.com/user/super3boy#p/c/DE37E771345BCC6F/28/I9ZYhBFSAR4
Super3boy's 29th Blender Tutorial(World Tab)
http://www.youtube.com/user/super3boy#p/c/DE37E771345BCC6F/29/Gftx40dVEzs
Super3boy's 30th Blender Tutorial(Landscapes with Heightmaps)
http://www.youtube.com/user/super3boy#p/c/DE37E771345BCC6F/30/rC4I3zpIFdE
Adding Objects From Other Files With Append
http://www.youtube.com/user/super3boy#p/u/24/X67IRjt4LQQ
Super3boy FastF12 Render Manager Preview
http://www.youtube.com/watch?v=oTU0-dGzjn8
Super3boy Question Session
http://www.youtube.com/profile?user=super3boy#p/u/3/dbvVeELHWqU
Basic Color Tutorial - Blender 3D
In this tutorial we will be learning how to add color to an object that has no texture.
1) Select your object.
2) Hit the "F5" or the shading button.
3) Hit the "Materials" button
4) Under the "Materials" section move the R,G,and B sliders to get your desired color.
5) Hit the "F12" key to render your work.
Links to other Color Tutorials
Blender Tutorial: Adding Color to Objects by vandrewlongstrider http://www.youtube.com/watch?v=xpNnGxSiayE
Blender Tutorial 4 (Colouring Your Object) by KlezHunter1 http://www.youtube.com/watch?v=9Ckaoxk-Ufs&feature=related
1) Select your object.
2) Hit the "F5" or the shading button.
3) Hit the "Materials" button
4) Under the "Materials" section move the R,G,and B sliders to get your desired color.
5) Hit the "F12" key to render your work.
Links to other Color Tutorials
Blender Tutorial: Adding Color to Objects by vandrewlongstrider http://www.youtube.com/watch?v=xpNnGxSiayE
Blender Tutorial 4 (Colouring Your Object) by KlezHunter1 http://www.youtube.com/watch?v=9Ckaoxk-Ufs&feature=related
Friday, November 13, 2009
Terrain via Height Map Tutorial- Blender Tutorial
In this tutorial we will be learning how to create a terrain using a height map.
(Note) For this tutorial you will need to have a height map. I got my Height Map from http://www.alvaromartin.net/images/surfaceclipmaps/heightmap.jpg
b. Mesh>
c. Plane
3) Hit the "5" key to resize times 5
4) Hit the "Enter" key
5) Go to "Edit" mode.
6) Under the "Mesh Tools" category hit the "Subdivide" button six times.
7) Go to "Object" mode.
8) Hit the "F5" key or select the Shading button.
9) Select the "Materials" button.
10) Hit the "Add New" button
11) Hit the "F6" key or select the "Texture" button
12) Under the "Texture" section hit the "Add New" button.
13) Change the "Texture Type" to "Image"
14) Hit the "Load" button
15) Load your Height Map
16) Under the "Map Image" category make sure the following are selected:
17) Hit the "F9" key or select the "Editing" button.
18) Go to "Edit" mode.
19) Go to "Front" view
20) Under the "Mesh Tools" category hit the "Noise" key several times until you get your desired height.
21) Under the "Modifiers" category hit the "Add Modifier" button and select "Subsurf."
22) Change "Levels" to 2
23) Hit the "F12" key to render your work.

Quake Wars Terrian Tutorial for Noobs using blender 3d by crumblycake1969 - http://www.youtube.com/watch?v=n4oeTTKvxBQ
(Note) For this tutorial you will need to have a height map. I got my Height Map from http://www.alvaromartin.net/images/surfaceclipmaps/heightmap.jpg

Terrain via Height Map Tutorial
1) Hit the Space Bar
a. Add>b. Mesh>
c. Plane
2) Hit the "S" Key to resize
6) Under the "Mesh Tools" category hit the "Subdivide" button six times.
10) Hit the "Add New" button
15) Load your Height Map
a. Mip Map
b. Interpol
c. Use Alpha
d. Clip
17) Hit the "F9" key or select the "Editing" button.
21) Under the "Modifiers" category hit the "Add Modifier" button and select "Subsurf."

Links to other Tutorial on Terrain via Height Map
Quake Wars Terrian Tutorial for Noobs using blender 3d by crumblycake1969 - http://www.youtube.com/watch?v=n4oeTTKvxBQ
Thursday, November 12, 2009
Blender Resources
Tutorials
Blender.org - www.blender.org
Blender Cookie - www.blendercookie.com/
CGTutsPlus - http://cg.tutsplus.com/
Montage Studio - http://montagestudio.org/home/
Vimeo - www.vimeo.com/channels/blendertuts
Youtube - www.youtube.com/
Textures & Images
Blender Materials - Open Material Repository - http://matrep.parastudios.de/index.php
CGTextures - www.cgtextures.com/
Photobucket - www.photobucket.com/
OpenFootage - http://www.openfootage.net/
AccuStudio - http://www.accustudio.com/
Light Probe Image Gallery - http://www.debevec.org/probes/
The Fat Strawberry - http://www.fatstrawberry.com/
The-Blueprints.com - http://www.the-blueprints.com/
Forums
Blender Artists - http://blenderartists.org/forum/
Nystic - http://www.forum.nystic.com/
CG Talk - http://forums.cgsociety.org/forumdisplay.php?f=91
Blender Newbies Forums - http://forums.blendernewbies.com/index.php
Blender.org - www.blender.org
Blender Cookie - www.blendercookie.com/
CGTutsPlus - http://cg.tutsplus.com/
Montage Studio - http://montagestudio.org/home/
Vimeo - www.vimeo.com/channels/blendertuts
Youtube - www.youtube.com/
Textures & Images
Blender Materials - Open Material Repository - http://matrep.parastudios.de/index.php
CGTextures - www.cgtextures.com/
Photobucket - www.photobucket.com/
OpenFootage - http://www.openfootage.net/
AccuStudio - http://www.accustudio.com/
Light Probe Image Gallery - http://www.debevec.org/probes/
The Fat Strawberry - http://www.fatstrawberry.com/
The-Blueprints.com - http://www.the-blueprints.com/
Forums
Blender Artists - http://blenderartists.org/forum/
Nystic - http://www.forum.nystic.com/
CG Talk - http://forums.cgsociety.org/forumdisplay.php?f=91
Blender Newbies Forums - http://forums.blendernewbies.com/index.php
Tuesday, November 10, 2009
Chrome Tutorial - Blender 3D
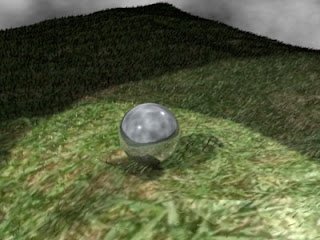
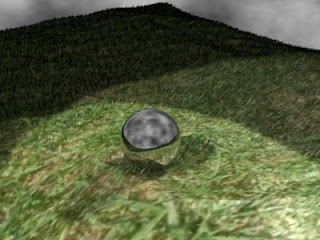
In these two tutorials we will be learning two different methods on how to give an object the appearance of chrome. You can see examples of each tutorial in renders below each tutorial.
CHROME TUTORIAL #1
To fully see the measures of this process in your renders, you will need to have a textured plane and a horizon set up.
1) Hit the "F5" key or select the "Shading" button.
2) Select the "Material" button.
3) In the Material section, change your R,G, and B values to these levels:
R -0.90
G - 0.95
B - 1.0
4) Select the "Shaders" tab which is located to the right of the "Material" section.
5) Set the "Ref" (Reflection) to 1.0.
6) Set the "Spec" (Specularity) to 1.018
7) Set the "Hard" (Hardness of the Specularity) to 511.
9) Select the "Bias" button.
10) Select the "Mirror Trans" tab which is located to the right of the "Shaders" tab.
11) Select the "Ray Mirror" button.
12) Set your "Ray Mir" level to 0.85
13) Set your "Fresnel" level (Located under the Ray Mirror section) to 1.4.
14) Set your "Frac" (Located under the ray Mirror section) level to 1.25.
15) Select the "Ray Transp" button located next to the "Ray Mirror" button.
16) Hit the "F12" button to render your work.
(Note) Remember your object(s) is a reflective surface. Without anything to reflect, the shine is not there. Remember to put your object on a textured plane and give it a horizon or a wall.
CHROME TUTORIAL #2
To fully see the measures of this process in your renders, you will need to have a textured plane and a horizon set up.
1) Turn on Ambient Occlusion.
2) Select your object.
3) Hit the "F5" key or select the "Shading" button
4) Select the "Materials" button
5) Set R,G,B to Black
R = 0
G = 0
B = 0
6) Select the "Mirror Trans" tab
7) Select "Ray Mirror" button
8) Set "Ray Mir:" to 0.85
9) Hit the "F10" key or select the "Screne" button.
10) Under the "Render" panel enable the Ray Tracing by selecting the "Ray" button.
11) Under the "Render" panel enable the "Shado" button.
12) Under the "Render" panel set the OSA to 5
13) Hit the "F12" key to render your work.
(Note) Remember your object(s) is a reflective surface. Without anything to reflect, the shine is not there. Remember to put your object on a textured plane and give it a horizon or a wall.
Links to other "Chrome" tutorials.
File: Nepeterson chrome.png - http://en.wikibooks.org/wiki/File:Nepeterson_chrome.png
Enhanced Reflections with HDR Images by Kernon Dillon
www.blendercookie.com/2009/09/03/improving-reflections-with-hdr-images/
CHROME TUTORIAL #1
To fully see the measures of this process in your renders, you will need to have a textured plane and a horizon set up.
1) Hit the "F5" key or select the "Shading" button.
2) Select the "Material" button.
3) In the Material section, change your R,G, and B values to these levels:
R -0.90
G - 0.95
B - 1.0
4) Select the "Shaders" tab which is located to the right of the "Material" section.
5) Set the "Ref" (Reflection) to 1.0.
6) Set the "Spec" (Specularity) to 1.018
7) Set the "Hard" (Hardness of the Specularity) to 511.
9) Select the "Bias" button.
10) Select the "Mirror Trans" tab which is located to the right of the "Shaders" tab.
11) Select the "Ray Mirror" button.
12) Set your "Ray Mir" level to 0.85
13) Set your "Fresnel" level (Located under the Ray Mirror section) to 1.4.
14) Set your "Frac" (Located under the ray Mirror section) level to 1.25.
15) Select the "Ray Transp" button located next to the "Ray Mirror" button.
16) Hit the "F12" button to render your work.
(Note) Remember your object(s) is a reflective surface. Without anything to reflect, the shine is not there. Remember to put your object on a textured plane and give it a horizon or a wall.

CHROME TUTORIAL #2
To fully see the measures of this process in your renders, you will need to have a textured plane and a horizon set up.
1) Turn on Ambient Occlusion.
2) Select your object.
3) Hit the "F5" key or select the "Shading" button
4) Select the "Materials" button
5) Set R,G,B to Black
R = 0
G = 0
B = 0
6) Select the "Mirror Trans" tab
7) Select "Ray Mirror" button
8) Set "Ray Mir:" to 0.85
9) Hit the "F10" key or select the "Screne" button.
10) Under the "Render" panel enable the Ray Tracing by selecting the "Ray" button.
11) Under the "Render" panel enable the "Shado" button.
12) Under the "Render" panel set the OSA to 5
13) Hit the "F12" key to render your work.
(Note) Remember your object(s) is a reflective surface. Without anything to reflect, the shine is not there. Remember to put your object on a textured plane and give it a horizon or a wall.

Links to other "Chrome" tutorials.
File: Nepeterson chrome.png - http://en.wikibooks.org/wiki/File:Nepeterson_chrome.png

Enhanced Reflections with HDR Images by Kernon Dillon
www.blendercookie.com/2009/09/03/improving-reflections-with-hdr-images/
Subscribe to:
Posts (Atom)