Search This Blog

Tuesday, December 8, 2009

Lighting Tutorial - Blender 3D 2.49

In this tutorial we will be learning a basic three light set up that you will be able to adjust and perfect to fit your styles and compositions.  We will also be learning the uses of the different lights used in blender.

1)  Select your default camera by right clicking on it.

2) Select the "Shading" button or hit the "F5" key.

3)  Select the lamp button.

4)  Select the "Spot" button under the "Preview" tab.  This changes your default light from a lamp to a spotlight.  This will be our primary light source and from here on out will be referred to as the "Key" light.

5)  Go to "Top View" by hitting the "3" key on your number pad.

KEY LIGHT

6)  Move your Key light 45 degrees to the right and front of your object.  Your key light is set up to cast shadows on your object giving it a sense of depth.

7)  Go to Front view.

8)  Move your Key light 30 degrees higher than your object and rotate it until the beam centers on your object.

9)  Set your distance to your desired level.  It should be long enough to at least reach the opposite side of your object.  This may be adjusted later to receive your desired effect.

10)  Set your "Energy" level to 1.2.  This may be adjusted later to receive your desired effect.

11)  Set the level of your SpotSi to hit the object(s) you want.  This setting adjusts the size of your spotlight area.  This may be adjusted later to receive your desired effect.

FILL LIGHT

12)  Go to Top View.

12)  Duplicate your Key Light by selecting it and hitting Shift + D.  Then hit Enter. This will be your Secondary light.

13)  Move your Fill light 45 degrees to the left and front of your object.  Your Fill light is set up to soften the shadows produced by your Key light.

14)  Go to Front View.

15)  Move your Fill light so that it is approximately level with your object.

16)  Rotate your Fill light so that the beam is centered on your object.

17)  Set your Energy level to 0.9.  This may be adjusted later to receive your desired effect.

RIM LIGHT

18)  Go to Top View.

19)  Duplicate your Secondary Light by selecting it and hitting Shift + D. Then hit Enter. This will be your Rim light.

20)  Move your Rim light directly behind your object.  Your Rim light is set up to establish your object(s) shape.  If your object was a person it would give your hair a glow and light up your shoulders.

21)  Go to Front View.

22)  Move your Rim Light above your object.

23)  Rotate your Rim light so that the beam is centered on your object.

24)  Set your Energy level to 0.7.  This may be adjusted later to receive your desired effect.

25)  Render your work.

Now that you know what each lamp's purpose is and you have a basic starting point for each it will be a lot easier to adjust all three to get the effect that you want.

LIGHT FUNCTIONS

SUN - The "Sun" option in blender lighting is a Rim light.  It is used to outline the tops of objects giving them a more defined outline.

SPOT - The "Spot" option in blender lighting can be used for any of your lighting puposes.  It can be used a a Key, Fill, and Rim light.  The Spot light is a hard light.  This means that it is going to give you very hard lines and dark shadows.

LAMP - The "Lamp" option in blender lighting can also be used a a Key, Fill, and Rim light.  The Lamp light provides a soft light.  This means that it is going to create softer lines and lighter shadows.

Sunday, December 6, 2009

Fog Tutorial - Blender 3D 2.49

In this tutorial we will be learning how to use the "Mist" button to create fog in your renders.

1)  Select your "Shading" button or hit the F5 key.


2)  Select the "World" button


3)  Enable the "Mist" button under the "mist/stars/physic" tab.


4) Select your camera

5)  Go to Editing or hit the F9 key


6)  Enable the "Mist" button located under the "Camera" tab in the "Show" section.


7)  Select the "Shading" button or hit the F5 Key


8) Select the "World" button


6) Set your start point by increasing or decreasing the values of "Start".  You can visually see your start point by looking at the line protruding from your camera.  This line gets further away from the camera as your "Start" value increases.


7) Set the distance of your fog by increasing or decreasing the values of your "Dist".   You can visually see your distance by looking at the like protruding from your camera.  This line gets longer as your "Dist" value increases.


8)  Set your height.  This is a trial and error process.  Choose a height and render your work.  Adjust your height as you see fit.


9)  Adjust the level of your intensity by increasing or decreasing the level of your "Misi".


10)  Render your work by hitting the F12 key

Thursday, November 19, 2009

Joining Selected Meshes Tutorial - Blender 3D

In this tutorial we will learn how to join two selected meshes to make them one unified object.  "Joining" is different than "Parenting."  When you join two meshes they become one solid object.  When you parent two objects they are still two separate objects that move together.  To Join two selected meshes follow the instructions below.


Joining Two Selected Meshes

1)  Make sure the two objects you want to join are selected.

2)  Hit CTRL + J

3) Selct Join selected meshes.

Separating Joined Meshes

1) Go to Edit mode

2) Hit the "P" key

3) Separate Menue
 * Selected - Separates the selected meshes
 * All loose parts.
 * By Material

Parenting (Grouping) Tutorial - Blender 3D

In this tutorial we will learn how to connect one object to another or a group of objects to another. This called "Parenting". 

1)  Make sure you have two or more objects selected.

2)  Hit CTRL + P

3) Select "Make Parent" 
(Note) The center of the chosen Parent is now connected to the center of the children with a dashed line. 
(Note) If you scale, rotate, or move any of the children or their parents you will do the same to all in the group.


Key Strokes
SHIFT-G Group Selection menu 
*Children - Selects all the active objects' children, and the children's children, up to the last generation.
*Immediate Children - Selects all the active objects' children only
*Parent - Selects the parent of the active object.
*Objects on shared layers - It selects all objects on the same layer of the selected object.

ALT + O
  moves the child to it's parent
ALT + P (Clear Parent) - Separates Parent from child 
ALT + P Clear parent and keep transform (Clear track) - Separates the children from the parent and returns them both to their original location, rotation, and scale.
ALT + P Clear parent inverse -

Sunday, November 15, 2009

Importing Objects Tutorial - Blender 3D

In this Tutorial we will be learning how to load an Object from one .Blend file to another.

1) Go into "File"

2) Select "Append or Link"


3) Choose the .Blend file your Object is in


3) Select "Object"


4) Select the Name of the Object you want to grab

5) Select "Load Library"
 
The Object you selected should now be on your screen.

Links to other tutorials on Importing Objects in Blender

Adding Objects From Other Files With Append by super3boy
http://www.youtube.com/watch?v=X67IRjt4LQQ

Special Blender Tutorial - Using the APPEND function by agent47crows
http://www.youtube.com/watch?v=4deJ5wDIBR8

Bits of Blender #35 - Appending and Linking by bitsofblender

http://www.youtube.com/watch?v=x8d46JwxwaU
 
Be creative, Be artistic, Be 3D and Blend well.

Saturday, November 14, 2009

Night Sky Tutorial - Blender 3D

In this tutorial we will learn how to make a night sky.

1)  Hit the "F5" key or select the "Shading" button.


2)  Select the "World" button.


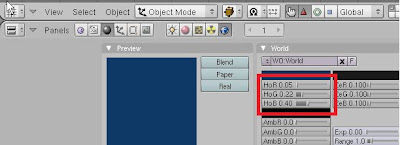
3)  Under the "World" section; set the HoR, HoG, and the HoB each to 0.00


4)  Under the "Mist /Stars /Phisi" section select the "Stars" button.


5)  Hit the "F12" key to render your work.

Links to other Night Sky Tutorials

Blender Tut 11: How to make Sky by hamsterhill
http://www.youtube.com/watch?v=FH1XBLZz-wI