Saturday, November 28, 2009
Thursday, November 19, 2009
Joining Selected Meshes Tutorial - Blender 3D
In this tutorial we will learn how to join two selected meshes to make them one unified object. "Joining" is different than "Parenting." When you join two meshes they become one solid object. When you parent two objects they are still two separate objects that move together. To Join two selected meshes follow the instructions below.
Joining Two Selected Meshes
1) Make sure the two objects you want to join are selected.
2) Hit CTRL + J
3) Selct Join selected meshes.
Separating Joined Meshes
1) Go to Edit mode
2) Hit the "P" key
3) Separate Menue
* Selected - Separates the selected meshes
* All loose parts.
* By Material
Joining Two Selected Meshes
1) Make sure the two objects you want to join are selected.
2) Hit CTRL + J
3) Selct Join selected meshes.
Separating Joined Meshes
1) Go to Edit mode
2) Hit the "P" key
3) Separate Menue
* Selected - Separates the selected meshes
* All loose parts.
* By Material
Parenting (Grouping) Tutorial - Blender 3D
In this tutorial we will learn how to connect one object to another or a group of objects to another. This called "Parenting".
1) Make sure you have two or more objects selected.
2) Hit CTRL + P
3) Select "Make Parent"
(Note) The center of the chosen Parent is now connected to the center of the children with a dashed line.
(Note) If you scale, rotate, or move any of the children or their parents you will do the same to all in the group.
Key Strokes
SHIFT-G Group Selection menu
*Children - Selects all the active objects' children, and the children's children, up to the last generation.
*Immediate Children - Selects all the active objects' children only
*Parent - Selects the parent of the active object.
*Objects on shared layers - It selects all objects on the same layer of the selected object.
ALT + O moves the child to it's parent
ALT + P (Clear Parent) - Separates Parent from child
ALT + P Clear parent and keep transform (Clear track) - Separates the children from the parent and returns them both to their original location, rotation, and scale.
ALT + P Clear parent inverse -
Sunday, November 15, 2009
Importing Objects Tutorial - Blender 3D
In this Tutorial we will be learning how to load an Object from one .Blend file to another.
1) Go into "File"
2) Select "Append or Link"
3) Choose the .Blend file your Object is in
3) Select "Object"
4) Select the Name of the Object you want to grab
5) Select "Load Library"
The Object you selected should now be on your screen.
Links to other tutorials on Importing Objects in Blender
Adding Objects From Other Files With Append by super3boy
http://www.youtube.com/watch?v=X67IRjt4LQQ
Special Blender Tutorial - Using the APPEND function by agent47crows
http://www.youtube.com/watch?v=4deJ5wDIBR8
Bits of Blender #35 - Appending and Linking by bitsofblender
http://www.youtube.com/watch?v=x8d46JwxwaU
Be creative, Be artistic, Be 3D and Blend well.
Saturday, November 14, 2009
Night Sky Tutorial - Blender 3D
In this tutorial we will learn how to make a night sky.
1) Hit the "F5" key or select the "Shading" button.
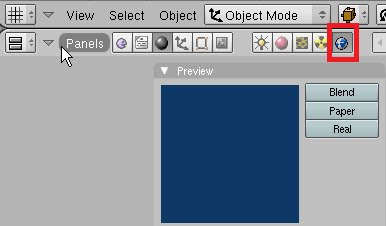
2) Select the "World" button.
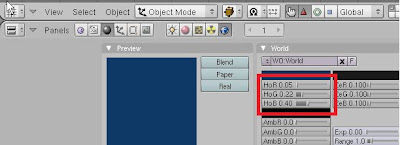
3) Under the "World" section; set the HoR, HoG, and the HoB each to 0.00
4) Under the "Mist /Stars /Phisi" section select the "Stars" button.
5) Hit the "F12" key to render your work.
1) Hit the "F5" key or select the "Shading" button.
2) Select the "World" button.
3) Under the "World" section; set the HoR, HoG, and the HoB each to 0.00
4) Under the "Mist /Stars /Phisi" section select the "Stars" button.
5) Hit the "F12" key to render your work.
Links to other Night Sky Tutorials
Blender Tut 11: How to make Sky by hamsterhill
http://www.youtube.com/watch?v=FH1XBLZz-wI
Super3boy's Tutorial List and Links
From newbies to professional Blender 3D users; there are few who have not learned something from Super3boy's YouTube tutorials. If you use Blender 3D for still pictures, video games, or animation; Super3boy has a tutorial for you.
Along with this list and it's links you will find a link to Super3boy's forum, Nystic. This forum and the people who use it have been an important part of my Blender 3D education. I am sure they would be a great asset to you as well.
Well here they are. A neatly compiled list of all Super3boy's tutorials and their links. Be creative, Be artistic, Be 3D and Blend well.
Nystic
http://forum.nystic.com/
Super3boy's First Blender Tutorial
http://www.youtube.com/user/super3boy#p/u/37/ozlwcQT-U20
Super3boy's First Blender Tutorial (Basics - Blender 2.5 Remake)
http://www.youtube.com/watch?v=3BwptkZCWwU
Super3boy's RPG Blender Tutorial #1 (Character Setup)
http://www.youtube.com/watch?v=nJEwLhnFwdk
Super3boy's Second Blender Tutorial(part 1)
http://www.youtube.com/profile?user=super3boy#p/u/35/xYkaHylMPdc
Super3boy's Second Blender Tutorial(part 2)
http://www.youtube.com/profile?user=super3boy#p/u/34/Q7omA7imr1k
Super3boy's Second Blender Tutorial(part 3) - Lost Episode
http://www.youtube.com/profile?user=super3boy#p/u/1/fwN6TFYxkU0
Super3boy's Third Blender Tutorial(Subsurf)
http://www.youtube.com/user/super3boy#p/c/DE37E771345BCC6F/3/bDJ76_chDDo
Super3boy's Fourth Blender Tutorial(Editing)
http://www.youtube.com/user/super3boy#p/c/DE37E771345BCC6F/4/LL-cYoTQI4Q
Super3boy's Fifth Blender Tutorial(Toolbar)
http://www.youtube.com/user/super3boy#p/c/DE37E771345BCC6F/5/l8ZiywMyiBM
Super3boy's Sixth Blender Tutorial(Materials)
http://www.youtube.com/user/super3boy#p/c/DE37E771345BCC6F/6/2kk2BkVQkyk
Super3boy's Seventh Blender Tutorial(Animation)
http://www.youtube.com/user/super3boy#p/c/DE37E771345BCC6F/7/FAZFfLmbD2k
Super3boy's Eighth Blender Tutorial(Scene)
http://www.youtube.com/user/super3boy#p/c/DE37E771345BCC6F/8/baPR_NOGxE8
Super3boy's Ninth Blender Tutorial(Particles)
http://www.youtube.com/user/super3boy#p/c/DE37E771345BCC6F/9/4ylN9yjCP_4
Super3boy's Tenth Blender Tutorial(UV Mapping)
http://www.youtube.com/user/super3boy#p/c/DE37E771345BCC6F/10/mVhhZ2KRr4Q
Super3boy's Twelfth Blender Tutorial(Making Waves)
http://www.youtube.com/user/super3boy#p/c/DE37E771345BCC6F/12/Q9EE5JLoCpk
Super3boy's 13th Blender Tutorial(Making a Basic Game)
http://www.youtube.com/user/super3boy#p/c/DE37E771345BCC6F/13/WGycLDs_dLg
Super3boy's 14th Blender Tutorial(A Cloth With Softbodies)
http://www.youtube.com/user/super3boy#p/c/DE37E771345BCC6F/14/mgYhZ3hWwTQ
Super3boy's 15th Blender Tutorial(Using Blender Fluids)
http://www.youtube.com/user/super3boy#p/c/DE37E771345BCC6F/15/yMBx2pYiqnY
Super3boy's 16th Blender Tutorial(Grass with Particles)
http://www.youtube.com/user/super3boy#p/c/DE37E771345BCC6F/16/M9aG0xBl9IM
Super3boy's 17th Blender Tutorial(Making A Chess Board)
http://www.youtube.com/user/super3boy#p/c/DE37E771345BCC6F/17/VhIvaWUxF1E
Super3boy's 18th Blender Tutorial(Beam Down Effect)
http://www.youtube.com/user/super3boy#p/c/DE37E771345BCC6F/18/lC2KgpdVUUU
Super3boy's 19th Blender Tutorial(Domino Physics)
http://www.youtube.com/user/super3boy#p/c/DE37E771345BCC6F/19/3kb_utKDu3o
Super3boy's 20th Blender Tutorial(Using Armatures)
http://www.youtube.com/user/super3boy#p/c/DE37E771345BCC6F/20/GbFvrilssNo
Super3boy's 21st Blender Tutorial(Making A Sword)
http://www.youtube.com/user/super3boy#p/c/DE37E771345BCC6F/21/whMozCIJGOw
Super3boy's 22nd Blender Tutorial(Using Dupliverts)
http://www.youtube.com/user/super3boy#p/c/DE37E771345BCC6F/22/M6EPXc8N3qs
Super3boy's 23rd Blender Tutorial(Matrix Bullet Time Effect)
http://www.youtube.com/user/super3boy#p/c/DE37E771345BCC6F/23/_7HFMApP7Dw
Super3boy's 24th Blender Tutorial(Explode Modifier)
http://www.youtube.com/user/super3boy#p/c/DE37E771345BCC6F/24/At3hIc-423c
Super3boy's 25th Blender Tutorial(Nodes)
http://www.youtube.com/user/super3boy#p/c/DE37E771345BCC6F/25/-tM1spWQ5aw
Super3boy's 26th Blender Tutorial(2.46 Hair, UV, and Grass)
http://www.youtube.com/user/super3boy#p/c/DE37E771345BCC6F/26/AmiyZ4sAdd8
Super3boy's 27th Blender Tutorial(SnapTo and Simple Deform)
http://www.youtube.com/user/super3boy#p/c/DE37E771345BCC6F/27/u29x_488jG4
Super3boy's 28th Blender Tutorial(Grease Pencil)
http://www.youtube.com/user/super3boy#p/c/DE37E771345BCC6F/28/I9ZYhBFSAR4
Super3boy's 29th Blender Tutorial(World Tab)
http://www.youtube.com/user/super3boy#p/c/DE37E771345BCC6F/29/Gftx40dVEzs
Super3boy's 30th Blender Tutorial(Landscapes with Heightmaps)
http://www.youtube.com/user/super3boy#p/c/DE37E771345BCC6F/30/rC4I3zpIFdE
Adding Objects From Other Files With Append
http://www.youtube.com/user/super3boy#p/u/24/X67IRjt4LQQ
Super3boy FastF12 Render Manager Preview
http://www.youtube.com/watch?v=oTU0-dGzjn8
Super3boy Question Session
http://www.youtube.com/profile?user=super3boy#p/u/3/dbvVeELHWqU
Basic Color Tutorial - Blender 3D
In this tutorial we will be learning how to add color to an object that has no texture.
1) Select your object.
2) Hit the "F5" or the shading button.
3) Hit the "Materials" button
4) Under the "Materials" section move the R,G,and B sliders to get your desired color.
5) Hit the "F12" key to render your work.
Links to other Color Tutorials
Blender Tutorial: Adding Color to Objects by vandrewlongstrider http://www.youtube.com/watch?v=xpNnGxSiayE
Blender Tutorial 4 (Colouring Your Object) by KlezHunter1 http://www.youtube.com/watch?v=9Ckaoxk-Ufs&feature=related
Friday, November 13, 2009
Terrain via Height Map Tutorial- Blender Tutorial
In this tutorial we will be learning how to create a terrain using a height map.
(Note) For this tutorial you will need to have a height map. I got my Height Map from http://www.alvaromartin.net/images/surfaceclipmaps/heightmap.jpg
b. Mesh>
c. Plane
3) Hit the "5" key to resize times 5
4) Hit the "Enter" key
5) Go to "Edit" mode.
6) Under the "Mesh Tools" category hit the "Subdivide" button six times.
7) Go to "Object" mode.
8) Hit the "F5" key or select the Shading button.
9) Select the "Materials" button.
10) Hit the "Add New" button
11) Hit the "F6" key or select the "Texture" button
12) Under the "Texture" section hit the "Add New" button.
13) Change the "Texture Type" to "Image"
14) Hit the "Load" button
15) Load your Height Map
16) Under the "Map Image" category make sure the following are selected:
17) Hit the "F9" key or select the "Editing" button.
18) Go to "Edit" mode.
19) Go to "Front" view
20) Under the "Mesh Tools" category hit the "Noise" key several times until you get your desired height.
21) Under the "Modifiers" category hit the "Add Modifier" button and select "Subsurf."
22) Change "Levels" to 2
23) Hit the "F12" key to render your work.
Quake Wars Terrian Tutorial for Noobs using blender 3d by crumblycake1969 - http://www.youtube.com/watch?v=n4oeTTKvxBQ
(Note) For this tutorial you will need to have a height map. I got my Height Map from http://www.alvaromartin.net/images/surfaceclipmaps/heightmap.jpg
Terrain via Height Map Tutorial
1) Hit the Space Bar
a. Add>b. Mesh>
c. Plane
2) Hit the "S" Key to resize
6) Under the "Mesh Tools" category hit the "Subdivide" button six times.
10) Hit the "Add New" button
15) Load your Height Map
a. Mip Map
b. Interpol
c. Use Alpha
d. Clip
17) Hit the "F9" key or select the "Editing" button.
21) Under the "Modifiers" category hit the "Add Modifier" button and select "Subsurf."
Links to other Tutorial on Terrain via Height Map
Quake Wars Terrian Tutorial for Noobs using blender 3d by crumblycake1969 - http://www.youtube.com/watch?v=n4oeTTKvxBQ
Thursday, November 12, 2009
Blender Resources
Tutorials
Blender.org - www.blender.org
Blender Cookie - www.blendercookie.com/
CGTutsPlus - http://cg.tutsplus.com/
Montage Studio - http://montagestudio.org/home/
Vimeo - www.vimeo.com/channels/blendertuts
Youtube - www.youtube.com/
Textures & Images
Blender Materials - Open Material Repository - http://matrep.parastudios.de/index.php
CGTextures - www.cgtextures.com/
Photobucket - www.photobucket.com/
OpenFootage - http://www.openfootage.net/
AccuStudio - http://www.accustudio.com/
Light Probe Image Gallery - http://www.debevec.org/probes/
The Fat Strawberry - http://www.fatstrawberry.com/
The-Blueprints.com - http://www.the-blueprints.com/
Forums
Blender Artists - http://blenderartists.org/forum/
Nystic - http://www.forum.nystic.com/
CG Talk - http://forums.cgsociety.org/forumdisplay.php?f=91
Blender Newbies Forums - http://forums.blendernewbies.com/index.php
Tuesday, November 10, 2009
Chrome Tutorial - Blender 3D
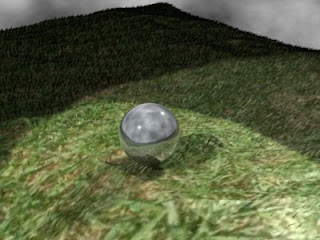
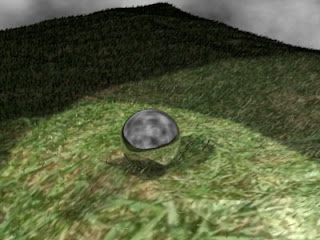
In these two tutorials we will be learning two different methods on how to give an object the appearance of chrome. You can see examples of each tutorial in renders below each tutorial.
CHROME TUTORIAL #1
To fully see the measures of this process in your renders, you will need to have a textured plane and a horizon set up.
1) Hit the "F5" key or select the "Shading" button.
2) Select the "Material" button.
3) In the Material section, change your R,G, and B values to these levels:
R -0.90
G - 0.95
B - 1.0
4) Select the "Shaders" tab which is located to the right of the "Material" section.
5) Set the "Ref" (Reflection) to 1.0.
6) Set the "Spec" (Specularity) to 1.018
7) Set the "Hard" (Hardness of the Specularity) to 511.
9) Select the "Bias" button.
10) Select the "Mirror Trans" tab which is located to the right of the "Shaders" tab.
11) Select the "Ray Mirror" button.
12) Set your "Ray Mir" level to 0.85
13) Set your "Fresnel" level (Located under the Ray Mirror section) to 1.4.
14) Set your "Frac" (Located under the ray Mirror section) level to 1.25.
15) Select the "Ray Transp" button located next to the "Ray Mirror" button.
16) Hit the "F12" button to render your work.
(Note) Remember your object(s) is a reflective surface. Without anything to reflect, the shine is not there. Remember to put your object on a textured plane and give it a horizon or a wall.
CHROME TUTORIAL #2
To fully see the measures of this process in your renders, you will need to have a textured plane and a horizon set up.
1) Turn on Ambient Occlusion.
2) Select your object.
3) Hit the "F5" key or select the "Shading" button
4) Select the "Materials" button
5) Set R,G,B to Black
R = 0
G = 0
B = 0
6) Select the "Mirror Trans" tab
7) Select "Ray Mirror" button
8) Set "Ray Mir:" to 0.85
9) Hit the "F10" key or select the "Screne" button.
10) Under the "Render" panel enable the Ray Tracing by selecting the "Ray" button.
11) Under the "Render" panel enable the "Shado" button.
12) Under the "Render" panel set the OSA to 5
13) Hit the "F12" key to render your work.
(Note) Remember your object(s) is a reflective surface. Without anything to reflect, the shine is not there. Remember to put your object on a textured plane and give it a horizon or a wall.
Links to other "Chrome" tutorials.
File: Nepeterson chrome.png - http://en.wikibooks.org/wiki/File:Nepeterson_chrome.png
Enhanced Reflections with HDR Images by Kernon Dillon
www.blendercookie.com/2009/09/03/improving-reflections-with-hdr-images/
CHROME TUTORIAL #1
To fully see the measures of this process in your renders, you will need to have a textured plane and a horizon set up.
1) Hit the "F5" key or select the "Shading" button.
2) Select the "Material" button.
3) In the Material section, change your R,G, and B values to these levels:
R -0.90
G - 0.95
B - 1.0
4) Select the "Shaders" tab which is located to the right of the "Material" section.
5) Set the "Ref" (Reflection) to 1.0.
6) Set the "Spec" (Specularity) to 1.018
7) Set the "Hard" (Hardness of the Specularity) to 511.
9) Select the "Bias" button.
10) Select the "Mirror Trans" tab which is located to the right of the "Shaders" tab.
11) Select the "Ray Mirror" button.
12) Set your "Ray Mir" level to 0.85
13) Set your "Fresnel" level (Located under the Ray Mirror section) to 1.4.
14) Set your "Frac" (Located under the ray Mirror section) level to 1.25.
15) Select the "Ray Transp" button located next to the "Ray Mirror" button.
16) Hit the "F12" button to render your work.
(Note) Remember your object(s) is a reflective surface. Without anything to reflect, the shine is not there. Remember to put your object on a textured plane and give it a horizon or a wall.

CHROME TUTORIAL #2
To fully see the measures of this process in your renders, you will need to have a textured plane and a horizon set up.
1) Turn on Ambient Occlusion.
2) Select your object.
3) Hit the "F5" key or select the "Shading" button
4) Select the "Materials" button
5) Set R,G,B to Black
R = 0
G = 0
B = 0
6) Select the "Mirror Trans" tab
7) Select "Ray Mirror" button
8) Set "Ray Mir:" to 0.85
9) Hit the "F10" key or select the "Screne" button.
10) Under the "Render" panel enable the Ray Tracing by selecting the "Ray" button.
11) Under the "Render" panel enable the "Shado" button.
12) Under the "Render" panel set the OSA to 5
13) Hit the "F12" key to render your work.
(Note) Remember your object(s) is a reflective surface. Without anything to reflect, the shine is not there. Remember to put your object on a textured plane and give it a horizon or a wall.

Links to other "Chrome" tutorials.
File: Nepeterson chrome.png - http://en.wikibooks.org/wiki/File:Nepeterson_chrome.png
Enhanced Reflections with HDR Images by Kernon Dillon
www.blendercookie.com/2009/09/03/improving-reflections-with-hdr-images/
Ambient Occlusion Tutorial - Blender 3D
In this tutorial we will be learning how to use Ambient Occlusion. We will learn a quick start Ambient Occlusion process and it's options.
Ambient Occlusion is a lighting option, or rather a lack of lighting. It takes the faces of nearby objects and removes the light on other nearby faces making it look like shadows.
Quick Start Ambient Occlusion
1) Hit the "F5" key or select the "Shading" button.
2) Select the "World" button
3) Select the "Ambient Occ" tab that sits next to the "Mist/Stars/Phisi" tab.
4) Select the "Ambient Occlusion" button.
5) Hit the "F12" button to render your work.
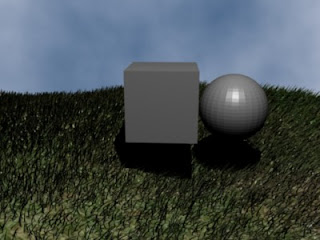
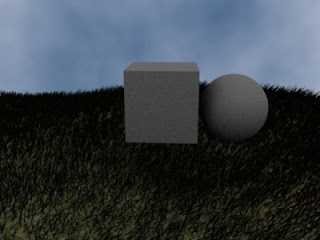
(Top - Default Lighting) (Botton - Ambient Occlusion with no lighting)
Options for Ambient Occlusion
Max Dist: These levels select the length of your rays. By increasing your rays you will get a much harsher ambient. By reducing the length of the rays you will get a softer ambient and your work will render faster.
Use Falloff: If you select this button you will be able to set the strength of your shadows depending on their distance from another object.
Gather Method button: this button has two option within. The first is "Raytrace". This is one way of selecting the occlusion gathering process. Your renders will take longer to render, but the quality will be higher. The other method is "Approximate." This is an alternate way of selecting the occlusion gathering process. This will reduce the time it takes to render your work, but the quality of the occlusion is lower.
Add button: This button adds light and shadows to your work.
Sub button: This button subtracts light and shadows to your work.
Both button: This button lightens and darkens your work.
Plain button: (Plain Diffuse Energy) This button makes your light energy white.
Sky Color button: This button uses zenith and horizon colors for your diffuse energy.
Sky Texture button: This button provides a total sky texture for your diffuse energy when you render your work.
Links to other tutorial for Ambient Occlusion
Blender tutorial 6 : Ambient occlusion by 3DMacDaddy - www.youtube.com/watch?v=RBo8UxMkW4Y
Learn how to enable Ambient Occlusion. Video. Audio
Bits of Blender #34 - Ambient Occlusion by bitsofblender - www.youtube.com/watch?v=H4OcZrVOykA
Video. Audio.
Ambient Occlusion is a lighting option, or rather a lack of lighting. It takes the faces of nearby objects and removes the light on other nearby faces making it look like shadows.
Quick Start Ambient Occlusion
1) Hit the "F5" key or select the "Shading" button.
2) Select the "World" button
3) Select the "Ambient Occ" tab that sits next to the "Mist/Stars/Phisi" tab.
4) Select the "Ambient Occlusion" button.
5) Hit the "F12" button to render your work.


(Top - Default Lighting) (Botton - Ambient Occlusion with no lighting)
Options for Ambient Occlusion
Max Dist: These levels select the length of your rays. By increasing your rays you will get a much harsher ambient. By reducing the length of the rays you will get a softer ambient and your work will render faster.
Use Falloff: If you select this button you will be able to set the strength of your shadows depending on their distance from another object.
Gather Method button: this button has two option within. The first is "Raytrace". This is one way of selecting the occlusion gathering process. Your renders will take longer to render, but the quality will be higher. The other method is "Approximate." This is an alternate way of selecting the occlusion gathering process. This will reduce the time it takes to render your work, but the quality of the occlusion is lower.
Add button: This button adds light and shadows to your work.
Sub button: This button subtracts light and shadows to your work.
Both button: This button lightens and darkens your work.
Plain button: (Plain Diffuse Energy) This button makes your light energy white.
Sky Color button: This button uses zenith and horizon colors for your diffuse energy.
Sky Texture button: This button provides a total sky texture for your diffuse energy when you render your work.
Links to other tutorial for Ambient Occlusion
Blender tutorial 6 : Ambient occlusion by 3DMacDaddy - www.youtube.com/watch?v=RBo8UxMkW4Y
Learn how to enable Ambient Occlusion. Video. Audio
Bits of Blender #34 - Ambient Occlusion by bitsofblender - www.youtube.com/watch?v=H4OcZrVOykA
Video. Audio.
Explode Tutorial - Blender 3D
In this tutorial we will learn how to make an object appear to explode.
1) Select your object.
2) Hit the "F7" key.
3) Select the "Particles" button.
4) Hit "Add New" in the Particle Systems section.
5) In the Particle System section, change "Amount" to 5000.
6) In the Particle System section, change "End" to 250
7) In the Particle System section, change "Life" to 100.
8) In the Particle System section, select the "Even" button
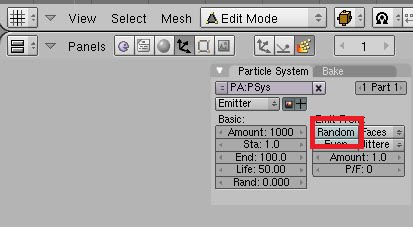
9) In the Particle System section, select the "Random" button,
10) In the Physics section, change "Normal" to 0.50.
11) In the Physics section, change "Random" to 0.070.
12) In the Visualization section select "Point" and change it to "None."
13) In the Visualization section select the "Render Emitter" button.
14) Hit the "F9" key.
15) In the Modifier section hit the "Add Modifier" button and add "Explode."
16) Hit the "ALT" and the "A" keys at the same time to preview your work.
17) Use the Frame Display to preview each picture or select a frame that you would like to render.
Links to other "Explode" Tutorials
explode modifier blender tutorial by blenderspy - www.youtube.com/watch?v=OIZItrsJdQk
Video. Audio.
-legendz- explosion tutorial (blender) by legendz53 - www.youtube.com/watch?v=G4ajf265G2Q
Video. Audio. Text Instructions.
blender tutorial explosion (less than 1 minute) by klikendish - www.youtube.com/watch?v=uiO66UUGbs4
Video. No Audio. Text Instructions
Object Layer Transfer Tutorial- Blender 3D
In this Tutorial we will be learning how to transfer an object from one layer to another. For you Blender veterans this tutorial is probably trivial, but as a newbie it would have saved me a lot of time.
1) Make sure you are in Object Mode.
2) Make sure the object you want to transfer is selected.
3) Make sure nothing else is selected.
4) Hit the "M" key.
5) A box of layers will appear. Select the layer that you want to transfer to by left clicking on it.
1) Make sure you are in Object Mode.
2) Make sure the object you want to transfer is selected.
3) Make sure nothing else is selected.
4) Hit the "M" key.
5) A box of layers will appear. Select the layer that you want to transfer to by left clicking on it.
Monday, November 9, 2009
Applying Physics Tutorial - Blender 3D
In this tutorial we will be learning how to apply physics to our renders. Blender 3D allows for realistic physics simulations. This means that it allows objects to roll, fall, and collide with other objects.
1) Hit the "F4" key.
2) Make sure your object(s) is selected.
3) Change it from "Static" to "Rigid Body"
4) Deselect the "Actor" button.
5) Follow steps 2 through 4 for each object you want to include in your render.
6) Hit the "P" key to preview.
7) Hit the "Game" tab at the top of your screen and select "Record Physics to IPO."
8) Hit the "P" key to preview.
9) Run through the frames to verify.
Links to other Physics Tutorials
Rigid Body Physics Tutorial #1 - Basics by raven67854 - http://www.youtube.com/watch?v=7QLum_cdCMA
Video. Audio.
Blender-Physics Tutorial by DanielSDZ - http://www.youtube.com/watch?v=S8L7nYQqHGw&feature=fvw
Video. Audio. Text Instructions.
Blue Sky Tutorial - Blender 3D
In this tutorial we will be learning how to give our renders a blue sky.
1) Hit the "F5" button or select the "Shading" button.
2) Hit the "World" button.
3) Hit the "Add New" button under the Texture and Input section.
4) Hit the "Map To" tab.
5) Hit the "Horizon" button.
6) Change the R,G,B to be white. Or set all to 1.0.
7) Hit the "F6" key or select the "Texture" Button
8) Change "Texture Type' to clouds.
9) Under the Clouds section change the Noise Size to 0.550.
10) Under the Clouds section change the Noise Depth to 6
12) Render your work.
(Note) Hit the "F12" button to render.
Links to other Sky Tutorials
Blender Tut 11: How to make a sky - www.youtube.com/watch?v=FH1XBLZz-wI
Learn how to make your backgrounds look like a day or night sky. Video. Audio.
Glass Tutorial - Blender 3D
In this tutorial we will learn how to make and object look like it is made of glass.
4) Lower the Alpha to 0.0
5) Hit the "Ray Mirror" button in the Shaders section.
6) Change Ray Mirror to read .30
7) Change Ray Mirror Depth to 3
8) Hit the "Ray Transparency" button in the Shaders section.
9) Change the Ray Transparency IOR to 1.50.
10)Change the Ray Transparency Depth to 3
11) Render your work.
(Note) Hit the "F12" button to render.
Links to other Glass Tutorials
Video. Audio.
Video. Audio
Grass Tutorial - Blender 3D
In this tutorial we will be learning how to add grass to a plane.
1) Make sure your plane is selected.
2) Hit the "F7" Button or select the "Object" button. (Highlighted In Red In the Picture Below)
3) Hit the "Particles Button." (Highlighted In Red In the Picture Below)
4) Hit the "Add New" button under Particle system. (Highlighted In Red In the Picture Below)
5) Change "Emitter" to "Hair" (Highlighted In Red In the Picture Below)
6) Change "Amount" to 30000 (Highlighted In Red In the Picture Below)
(Note) This amount is just a starting point. Depending on how big your plane is you may need more or less.
7) Click the "Random" button under the Emit From: section. (Highlighted In Red In the Picture Below)
8) Click the "Even" button under the Emit From: section. (Highlighted In Red In the Picture Below)
9) Change "Normal" to .020 under the Initial Velocity section. (Highlighted In Red In the Picture Below)
10) Change "Random" to .020 under the Initial Velocity section. (Highlighted In Red In the Picture Below)
11) Change the AccX:, AccY:, and AccZ:, each to 0.01 (Highlighted In Red In the Picture Below)
12) Hit the "Emitter" button under the Render section. (Highlighted In Red In the Picture Below)
(Note) This button lets you see the emitter in render.
13) Hit the "F5" key or the "Shading" button. (Highlighted In Red In the Picture Below)
14) In the Links and Pipeline section under link to object hit the "Add New" button. (Highlighted In Red In the Picture Below)
15) Hit the "Strands" button under the Render Pipeline section. And change the Start and End to read:
A) Start 1.25
B) End 0.25
(Highlighted In Red In the Picture Below)
16) Change the R,G,B to read:
A) R 0.01
B) G 0.06
C) B 0.01
(Highlighted In Red In the Picture Below)
(note) This is just a guide line. Adjust this to suit the color you want.
17) Hit the "F6" key or select the "Textures" button. (Highlighted In Red In the Picture Below)
18) Hit the "Add New" button under the Texture section. (Highlighted In Red In the Picture Below)
19) Change Texture Type to Image. (Highlighted In Red In the Picture Below)
20) Click the "Load" button under the Image section. (Highlighted In Red In the Picture Below)
21) Select your image.
(Note) I got my image from http://www.photobucket.com/ Just search "Grass Texture."
22) Render your work.
(Note) Hit the "F12" key to render.
Links to other Grass Tutorials
The Secret to Creating Realistic Grass - http://www.blenderguru.com/the-secret-to-creating-realistic-grass/
Blender Grass Tutorial by BjornkeGeish - www.youtube.com/watch?v=UJ_YT2FeiIU
Learn how to produce high quality grass using using Blender 2.49a and it's Particle system. Video. Audio.
"Grass" Blender Tutorial by CathyDirector - www.youtube.com/watch?v=1NclixES8iU
Video. Audio
1) Make sure your plane is selected.
2) Hit the "F7" Button or select the "Object" button. (Highlighted In Red In the Picture Below)
3) Hit the "Particles Button." (Highlighted In Red In the Picture Below)
4) Hit the "Add New" button under Particle system. (Highlighted In Red In the Picture Below)
5) Change "Emitter" to "Hair" (Highlighted In Red In the Picture Below)
6) Change "Amount" to 30000 (Highlighted In Red In the Picture Below)
(Note) This amount is just a starting point. Depending on how big your plane is you may need more or less.
7) Click the "Random" button under the Emit From: section. (Highlighted In Red In the Picture Below)
9) Change "Normal" to .020 under the Initial Velocity section. (Highlighted In Red In the Picture Below)
10) Change "Random" to .020 under the Initial Velocity section. (Highlighted In Red In the Picture Below)
11) Change the AccX:, AccY:, and AccZ:, each to 0.01 (Highlighted In Red In the Picture Below)
12) Hit the "Emitter" button under the Render section. (Highlighted In Red In the Picture Below)
(Note) This button lets you see the emitter in render.
13) Hit the "F5" key or the "Shading" button. (Highlighted In Red In the Picture Below)
14) In the Links and Pipeline section under link to object hit the "Add New" button. (Highlighted In Red In the Picture Below)
15) Hit the "Strands" button under the Render Pipeline section. And change the Start and End to read:
A) Start 1.25
B) End 0.25
(Highlighted In Red In the Picture Below)
16) Change the R,G,B to read:
A) R 0.01
B) G 0.06
C) B 0.01
(Highlighted In Red In the Picture Below)
(note) This is just a guide line. Adjust this to suit the color you want.
17) Hit the "F6" key or select the "Textures" button. (Highlighted In Red In the Picture Below)
18) Hit the "Add New" button under the Texture section. (Highlighted In Red In the Picture Below)
19) Change Texture Type to Image. (Highlighted In Red In the Picture Below)
20) Click the "Load" button under the Image section. (Highlighted In Red In the Picture Below)
21) Select your image.
(Note) I got my image from http://www.photobucket.com/ Just search "Grass Texture."
22) Render your work.
(Note) Hit the "F12" key to render.
Links to other Grass Tutorials
The Secret to Creating Realistic Grass - http://www.blenderguru.com/the-secret-to-creating-realistic-grass/
Blender Grass Tutorial by BjornkeGeish - www.youtube.com/watch?v=UJ_YT2FeiIU
Learn how to produce high quality grass using using Blender 2.49a and it's Particle system. Video. Audio.
"Grass" Blender Tutorial by CathyDirector - www.youtube.com/watch?v=1NclixES8iU
Video. Audio
Subscribe to:
Posts (Atom)


